Put Repetitive Tasks On Autopilot with Automation
Automation workflows are built on a linear timeline with a combination of qualifying conditions and follow-up actions (If this, then that). Prospects and contacts are automatically enrolled into the automation track when they match the initial qualifying conditions set in the workflow.
Automation workflows can be utilized for both business process management as well as for prospect and customer outreach. Automation conditions and actions touch every feature that is available within the Leadfwd platform, to provide a near infinite number of potential use cases and logical equations to match your specific requirements.
Introduction
|
Automation Manager

The automation manager displays all workflows that are running, inactive or yet to be completed. You can easily see the last time a Lead was enrolled, the number of Leads as well as which user created the workflow. You can also activate, clone or delete automated workflows seamlessly with the manage (gear) icon located at the end of the workflow.
| Create a new Automation Workflow | |
| Access Send Report (via Email) and Export to a CSV | |
| Search for a specific Automation Workflow by name | |
| Filter Automation Workflows by Condition type, Action type or Tag assignment. | |
| Access options for a specific Automation Workflow | |
| Activates an Automation Workflow that's presently paused | |
| Pauses an Automation Workflow that's presently activated |
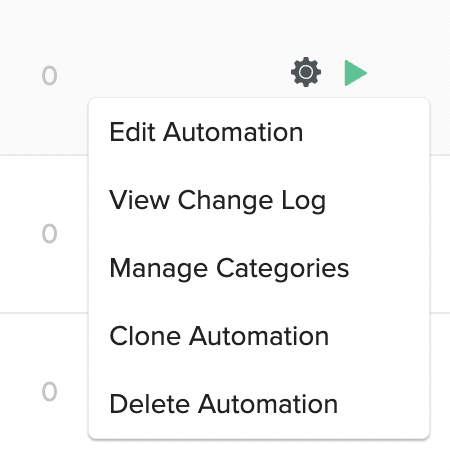
Edit |
Access the Automation builder to customize conditions and follow up actions. |
Change log |
Review historical changes by user for the entire workflow. |
Tag and Organize |
Assign tags to categorize your workflows for quicker access using advanced filters. |
Clone |
Replicate an automation workflow as a new workflow, including conditions and actions. |
Delete |
Permanently remove your automation workflow. |
How It Works
Automation workflows are linear timelines that are comprised of qualifying events (Conditions) and follow up's (Actions), which are triggered when qualifying events are matched to a contact in your platform.
Example |
||
If This: |
Then That: |
|
| Condition: Contact visits leadfwd.com/pricing | Wait 5 min. | Action: Add Contact to Warm Sequence |
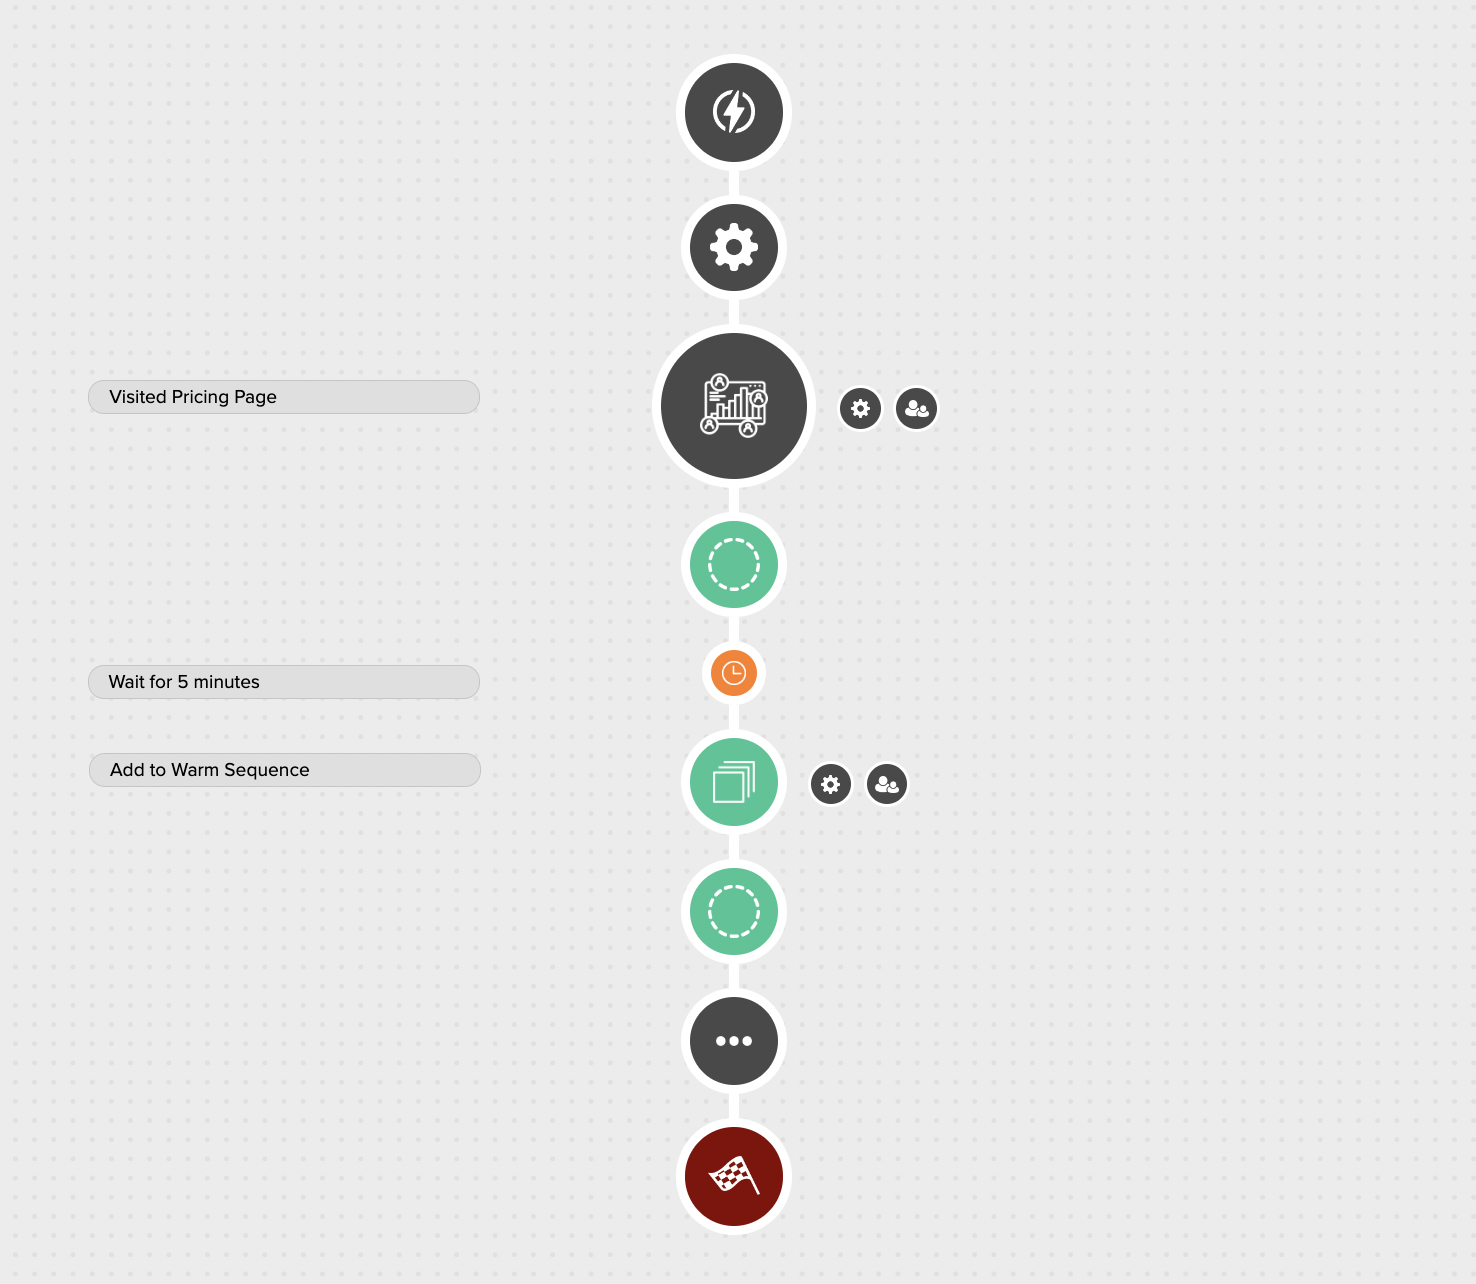
Conditions always precede an Action and a Wait Connector is used to bridge a Condition and Action together. Multiple Conditions may be included in a single block. You may have multiple Condition blocks in a single linear workflow. Multiple actions can be linked concurrently as well.
Conditions |
A Condition block is a single or group of rules that are bound by an AND/OR statement. Your Automated Workflow can have as many Condition blocks as you wish and a Condition block can contain multiple unique condition types. Condition blocks are always followed by a Wait Connector that sets the time delay before the follow up Action block is triggered. |
Wait Connector |
Wait Connectors bridge Condition events and follow up Actions together and set a specific timed delay in-between a condition being true and an action being triggered. The timed delay can be as small as 2 minutes. |
Actions |
An Action block is a single or group of follow up actions that are triggered for Contacts that have matched the previous Condition block(s). Actions are executed once the Wait Connector timed delay lapses. Action Blocks can contain multiple unique action types and each action contained in a single block is separated by a Wait Connector, so once a Contact reaches the Action block, each action will trigger in a linear sequence based on the Wait Connector and not all at once. |
Automation Workflow Requirements
- List Source
- Matching Setting
- At Least One (1) Condition Block
- At Least One (1) Action Block
- An 'End' Added to the Automation Workflow Timeline
Contact Eligibility for Enrollment in a Workflow
- Contact Must Be A Member Of The List Source For The Automation
- Contact Record Status Must Be Set to Active
- Contact Must Match The First Condition Block
Automation Workflow Canvas
The Automation Workflow Canvas is a step-by-step, point-and-click interface. Each Automation workflow is arranged in a linear timeline that goes top to bottom and contains a mix of conditional blocks and follow up action blocks, separated by timed delays (wait connectors) and in some cases, logical operators (AND/OR).
| Settings: Edit and manage settings related to the Automation configuration or individual conditions and actions. | |
| Reports & Analytics: View detailed reporting for individual conditions and actions including specific contact touches and behavior. | |
|
Delete: Permanently delete a single condition or action. It's important to note that this option will only be available if an object is eligible to be deleted. If a removal will break a workflow, it will not be permitted. For example, a workflow cannot have actions on the canvas without conditions. So removing all conditions that precede an action block would not be permitted. |
|
| Rearrange: Change the order of actions contained in a single block. | |
| Wait Connector: Automatic pause between events in your workflow timeline. | |
| AND Statement: Logical rule that requires a condition block with multiple condition types/rules, to Match All conditions for the block statement to be true. | |
| OR Statement: Logical rule that requires a condition block with multiple condition types/rules, to Match Any conditions for the block statement to be true. | |
| Add Another: Logical rule that requires a condition block with multiple condition types/rules, to Match Any conditions for the block statement to be true. |
Create an Automation Workflow
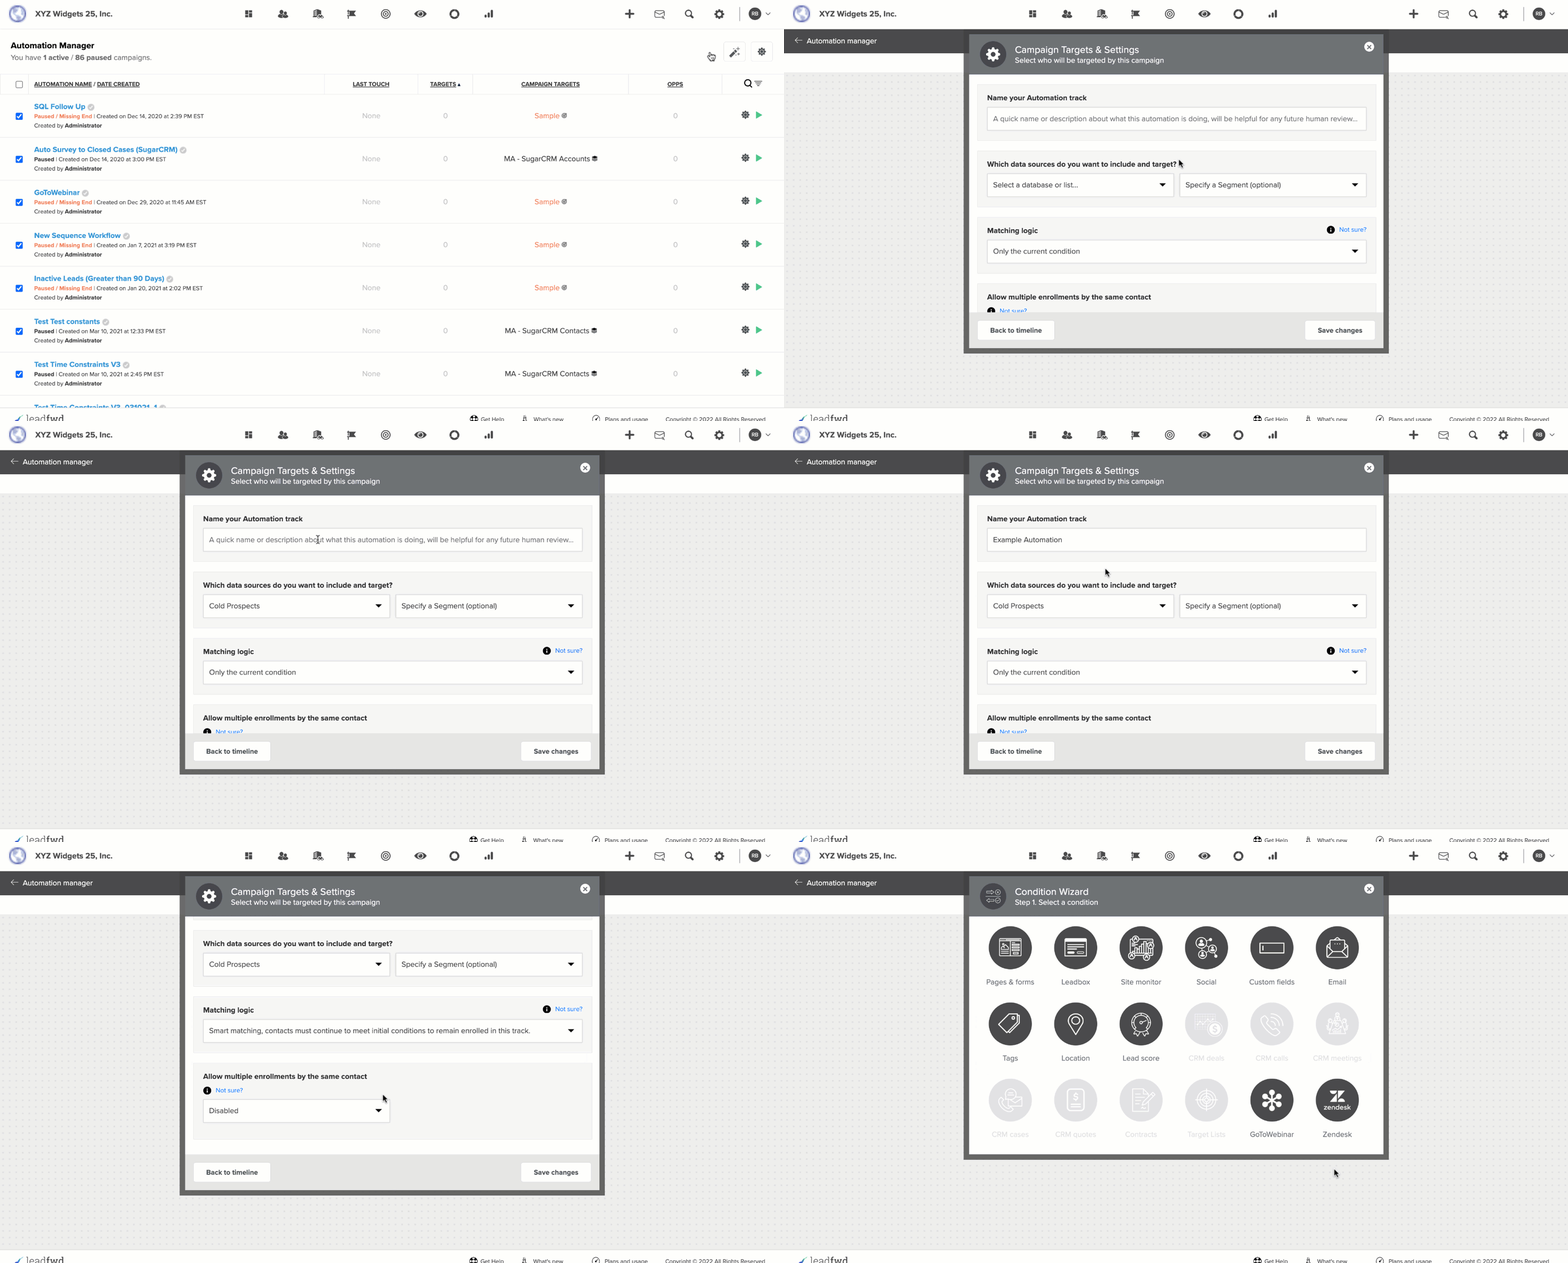
Select a data source for your Automation Workflow
The first step to creating an Automation Workflow is to define the data list that will be used to import contacts into the workflow. Workflows are limited to a single list assignment at present. But, it's important to note that assigning a list to your Workflow does not automatically enroll every contact on your list into the workflow.
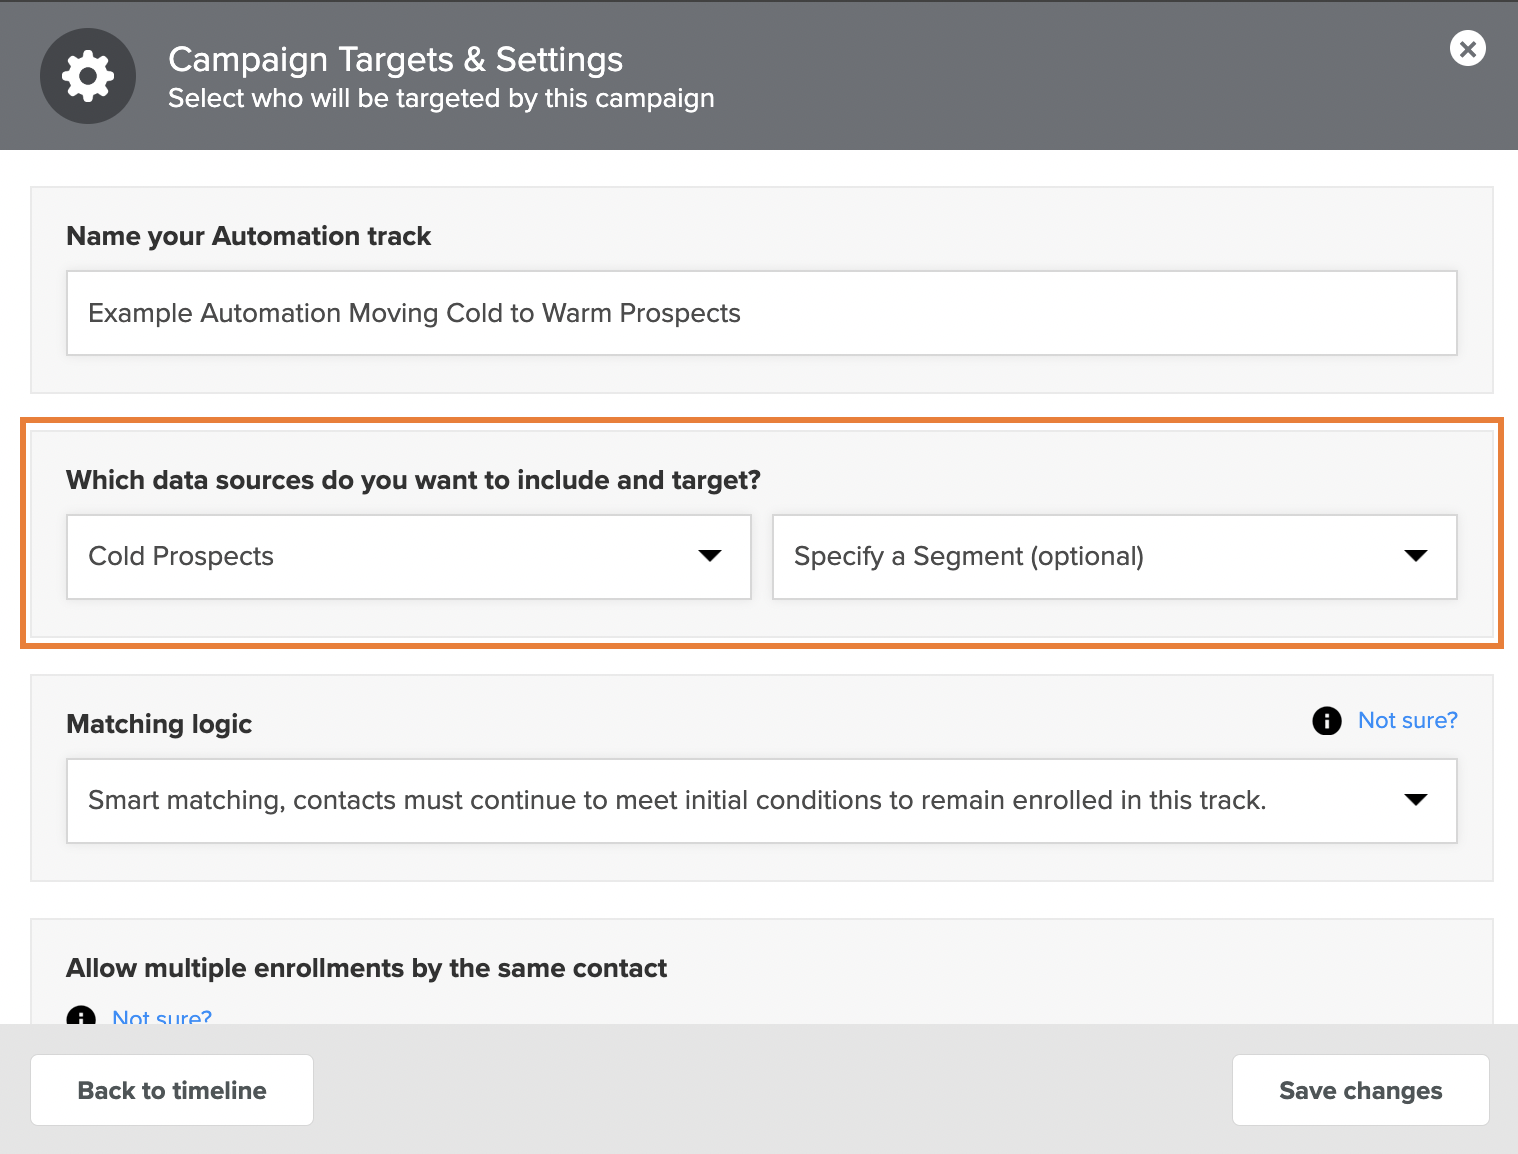
Automation Workflow timelines always begin with a condition block and the first condition block determines which contacts are enrolled in the workflow. Contacts must match the conditional rules that are defined in your condition block to be automatically imported into the workflow from the assigned list. There is no manual enrollment option to add contacts to a workflow, however Tags can be used for easy enrollment into a workflow.
Matching logic for multiple conditional rules
The Automation platform is constantly checking new and modified contacts to see if they match condition(s) for any workflows. Once a contact matches your first condition block and is successfully enrolled into the Automation workflow, how they continue to qualify for the workflow when multiple conditional steps exist depends on the matching logic you define.
The matching logic defines the rules for how multiple conditions blocks are treated as a contact navigates through the linear journey through the automation.
Smart |
Smart workflows are exactly that, smart. The first condition block must ALWAYS continue to match for future actions to take place as a contact continues through the workflow. Smart logic allow you to create intelligent, goal-driven workflows that will enable you to target contacts as long as they continue to meet a specific profile (as defined by the first condition block), up until that profile changes. Use case: If you select Smart logic with a Tag condition that requires a specific Tag assignment, and include that condition into the first condition(s) block, then the contact MUST continue to be assigned that tag in order to continue qualifying for the workflow. If the tag assigned to the contact is ever removed, then the workflow immediately ends for that contact. |
Current Condition |
By selecting Current Condition matching logic, then the Automation workflow will only consider the current Condition block that a contact has reached. The logical engine will not check to see if any previous condition rules are still true. In effect, any previously matched conditions are irrelevant and all that matters is the path ahead. Use case: A contact has been enrolled into an Automation workflow based on their lead score reaching a specific threshold, but that lead score subsequently changes. The contact will continue to qualify for actions that followed the first condition block and the contact will be considered for additional condition block(s) that are contained in the linear journey of the workflow. The Automation Workflow will not automatically end for this contact. |
Current and Previous Conditions |
Current and Past Condition matching requires that all previous conditions that a contact matched in an Automation Workflow must continue to be true. Before any additional actions trigger, the logic engine will re-check all previous conditions to ensure that every previously matched condition in their journey is still true. Current and Previous Condition logic is similar to Smart logic, except that Smart logic will only re-check the first condition block to validate that it's still true. |
Repeat and Recurring Automated Workflows
An Automated Workflow can be configured as a one-time use enrollment per unique contact or it can be configured to allow multiple enrollments by the same contact, when a new condition event takes place.
A common and simple use case for repeat workflows would be to execute actions on the anniversary of a date, such as a customer birthday or the renewal or expiration of a service.
You can define limitations to the repeat configuration, including a maximum number of repeat enrollments for a single contact and a timed delay in between multiple enrollments.
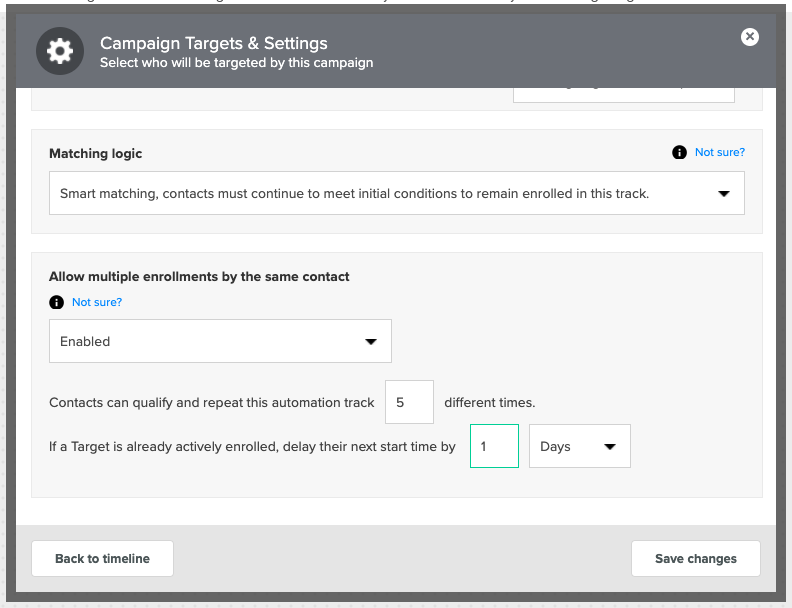
To enable Recurring Automation, enable the Allow multiple enrollments by the same contact option.
Contacts can qualify and repeat this automation {X} different times. |
|
You can define a ceiling of how many unique enrollments a single contact can participate in, within this specific workflow. In order for a contact to be considered for a subsequent enrollment, they will need to be meet the following criteria:
|
If a Target is already actively enrolled, delay their next start time by {X} time. |
|
Once you determine the maximum number of enrollments a unique Lead can have, the next step is to configure a delay between multiple enrollments. The concept behind configuring a delay is to ensure that if a Lead has multiple qualifying condition events, that they don't enroll in the Automated Workflow multiple times all at the same time. Configuring a delay will space out their enrollment(s) by the time period you define.
So for example, if Lead John Doe enrolls in an Automated Workflow with a delay of 5 days and has multiple qualifying condition events, it will be another 5 days before another enrollment and run can begin.
Once the basics of your campaign is settled, you can now begin to select your Conditions. |
Add your first condition block
After you select your database list you will need to create your first condition block. The first condition block serves as the opening trigger for the enrollment of contacts from the selected source list. It's also the criteria that will drive Smart matching, as this will be the condition(s) that will be re-checked before each follow up action in your workflow is triggered.
Learn more about each available condition option for workflows.
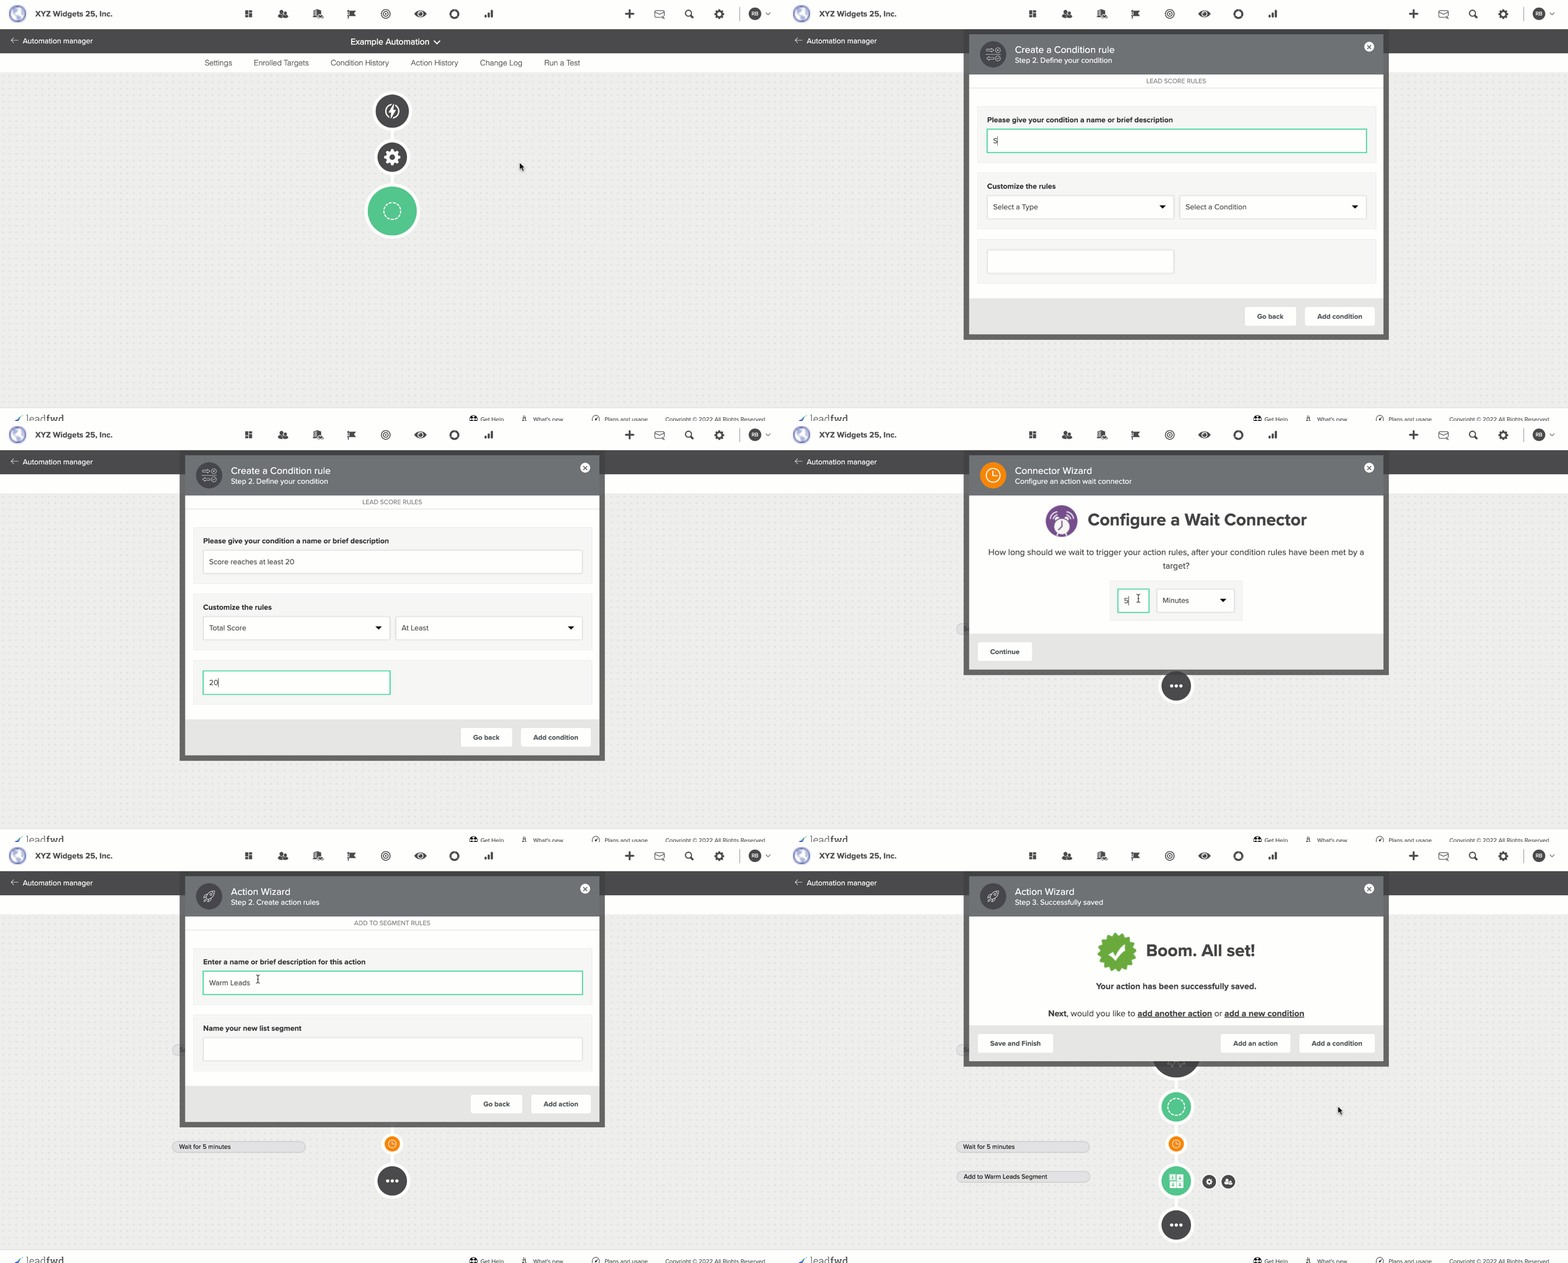
Example above: Creating a condition based on a contacts lead score.
Add and connect multiple conditions
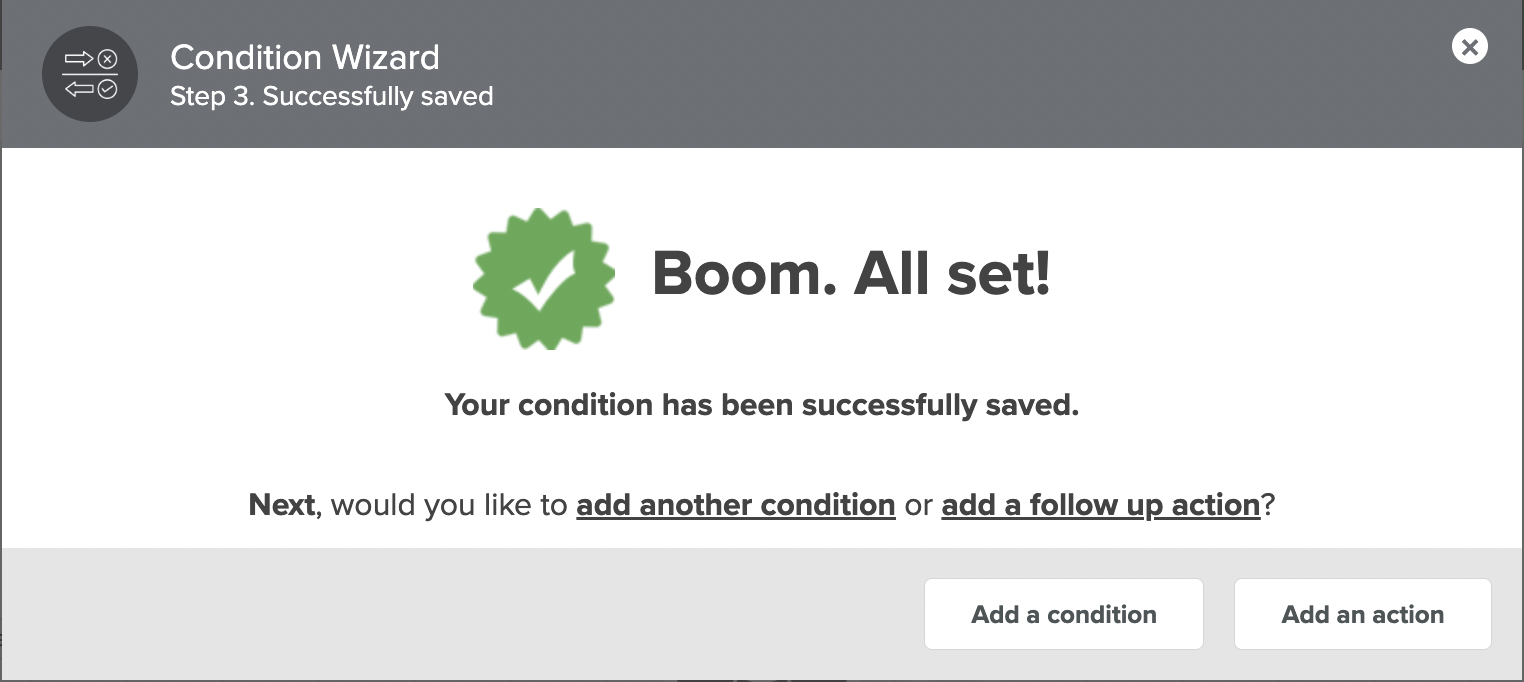
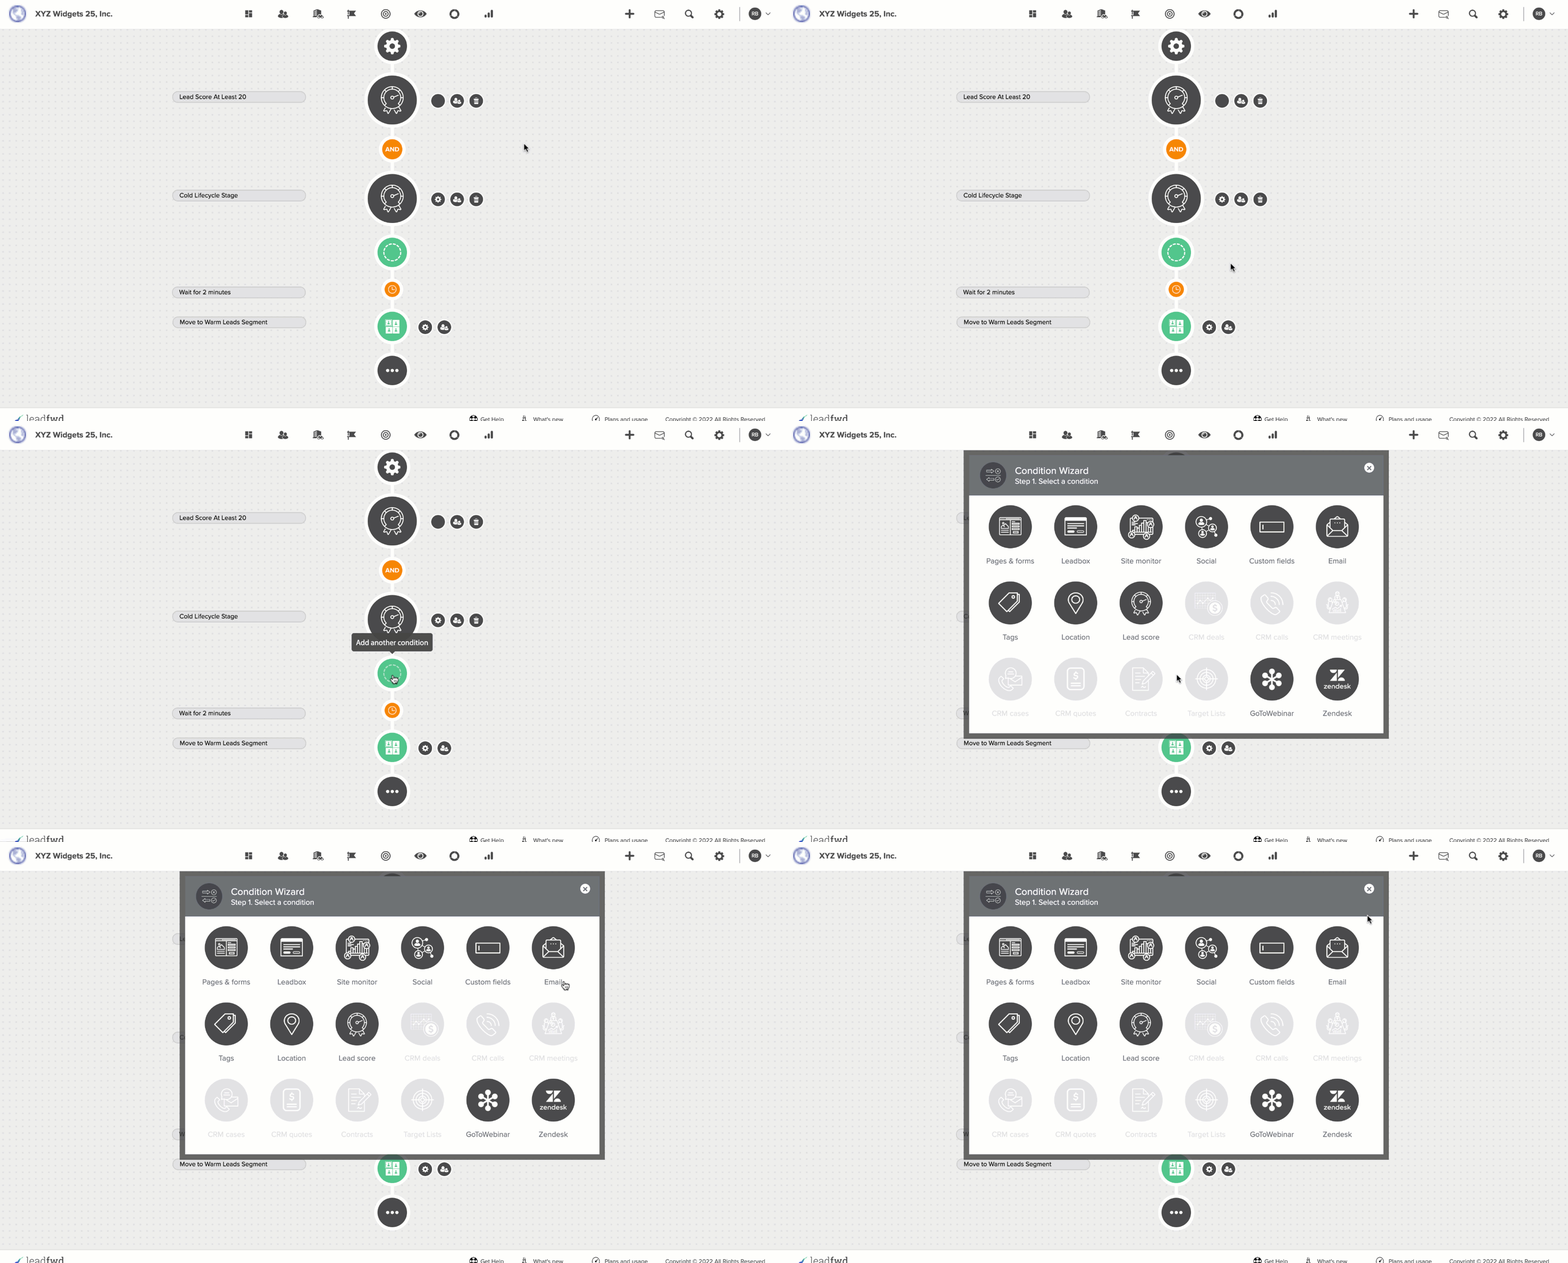
Following every 'Save' event for a condition, you will be prompted to either Add another condition or continue by adding a follow up action.
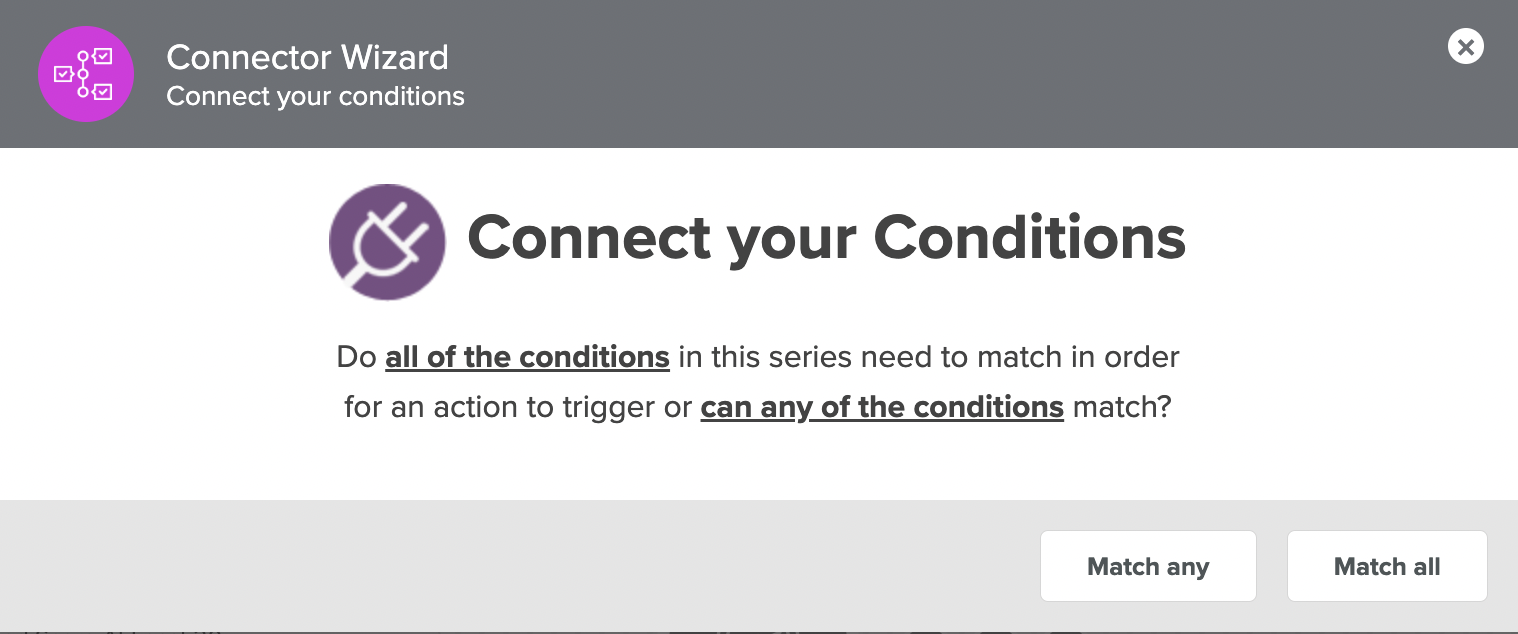
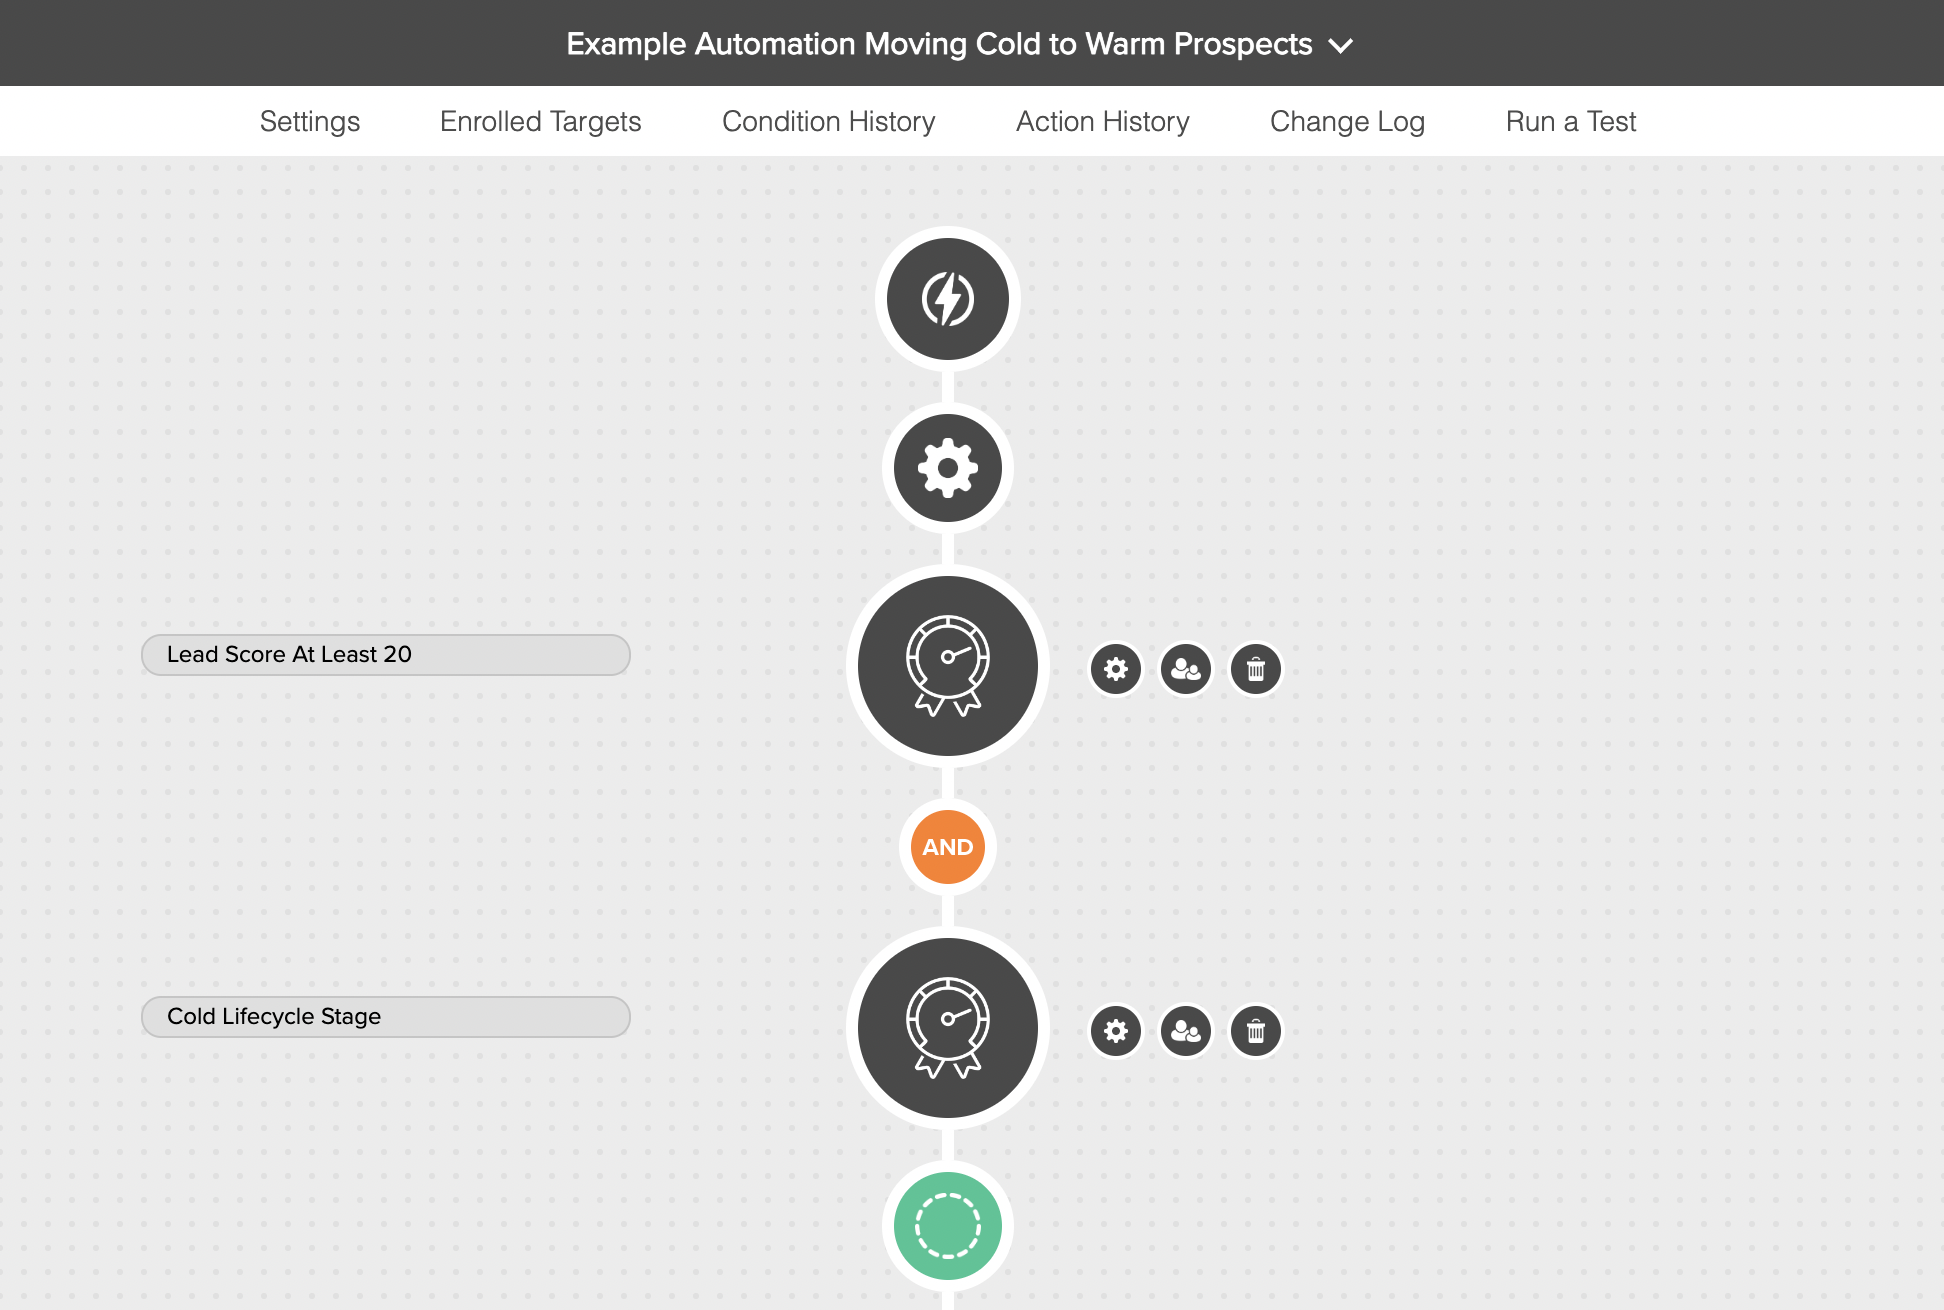
You can combine multiple condition types and rules into a single condition block using a shared rule to Match Any of the conditions individually or Match All of the conditions.
Multiple conditions within a single block will be bound by an ANY / OR destination in between the individual conditions on the Automation timeline, as shown below:
Once a condition block is completed and follow up actions are defined after the conditions in the timeline, you can still modify the previous and existing condition block by clicking the Add Another Condition option:
Add a Wait Connector
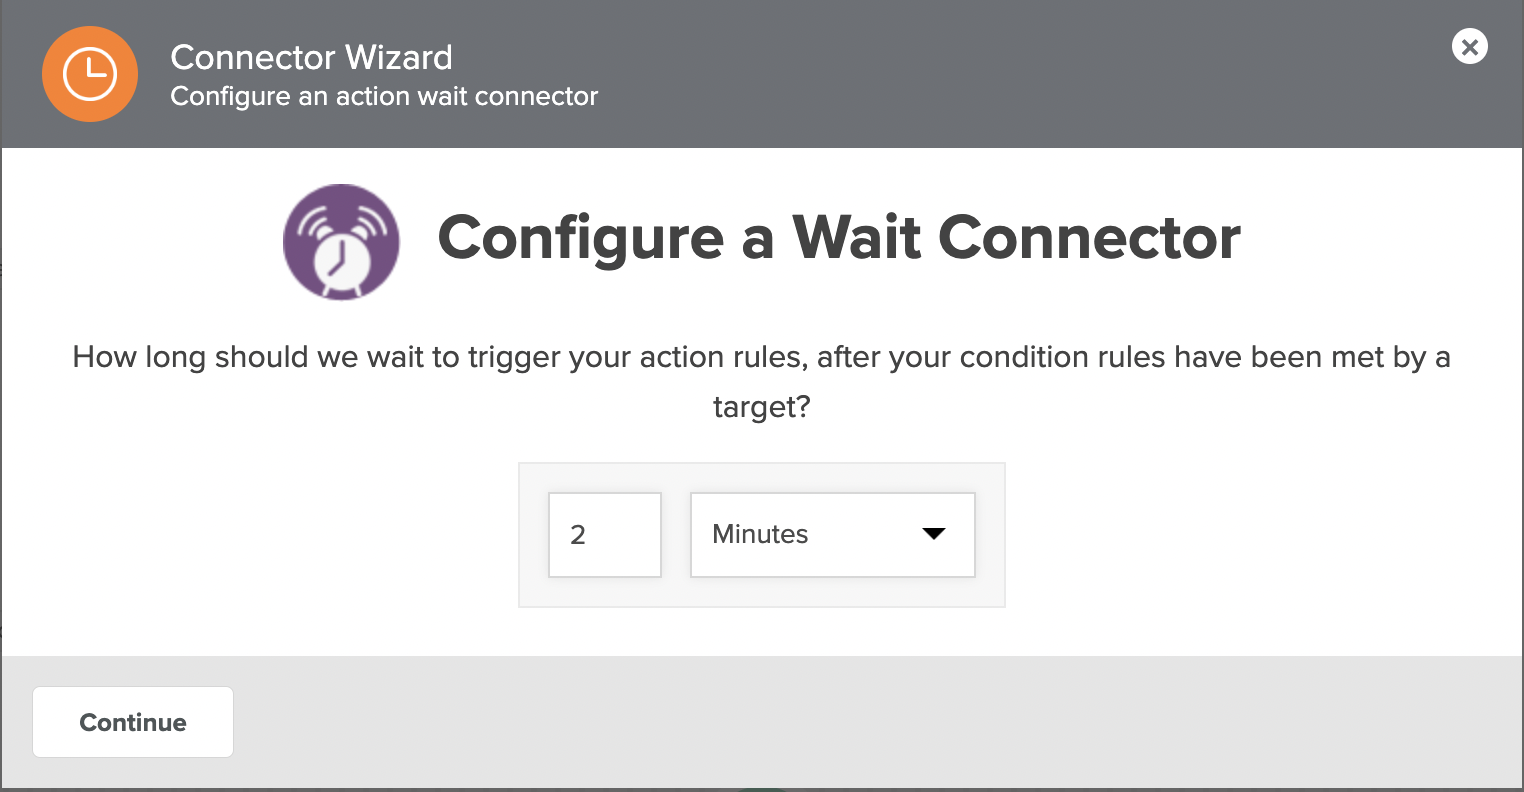
Once you finish adding your condition block, you'll be prompted to add a follow up action. Before a follow up action is triggered, there will be an automatic pause that's executed by a Wait Connector. The Wait Connector defines how much time will lapse after a condition block matches, before the action block that follows should trigger. This period can be minutes, hours, days or weeks. Wait Connectors act as a bridge between Conditions and Action, as well as multiple connected Actions.
Add follow up Actions
The final step of your logic block is to define follow up action(s) that will trigger for a contact that met your previous condition(s) block. Similarly to conditions, you can include several follow up actions all connected together with AND and you can even define Wait Connectors between each follow up action as well.

With one condition block and one action block bound by a wait connector, you now have a complete logical workflow. At this stage you can opt to complete the work flow, by selecting Save and finish (as shown above) or you can continue building by adding more actions or by adding another phase of the journey with more conditions and then follow up actions.
For example, a second conditional phase of the workflow journey can include activities that were the result of actions taken in the workflow. These actions can include a contact opening an email or clicking a link from an email that was sent by the workflow.
Activate the workflow
Once you select Save and finish you will notice a 'Flag' icon at the end of the workflow timeline, which indicates that an end to the logic has been defined. At which point you can now activate your workflow.
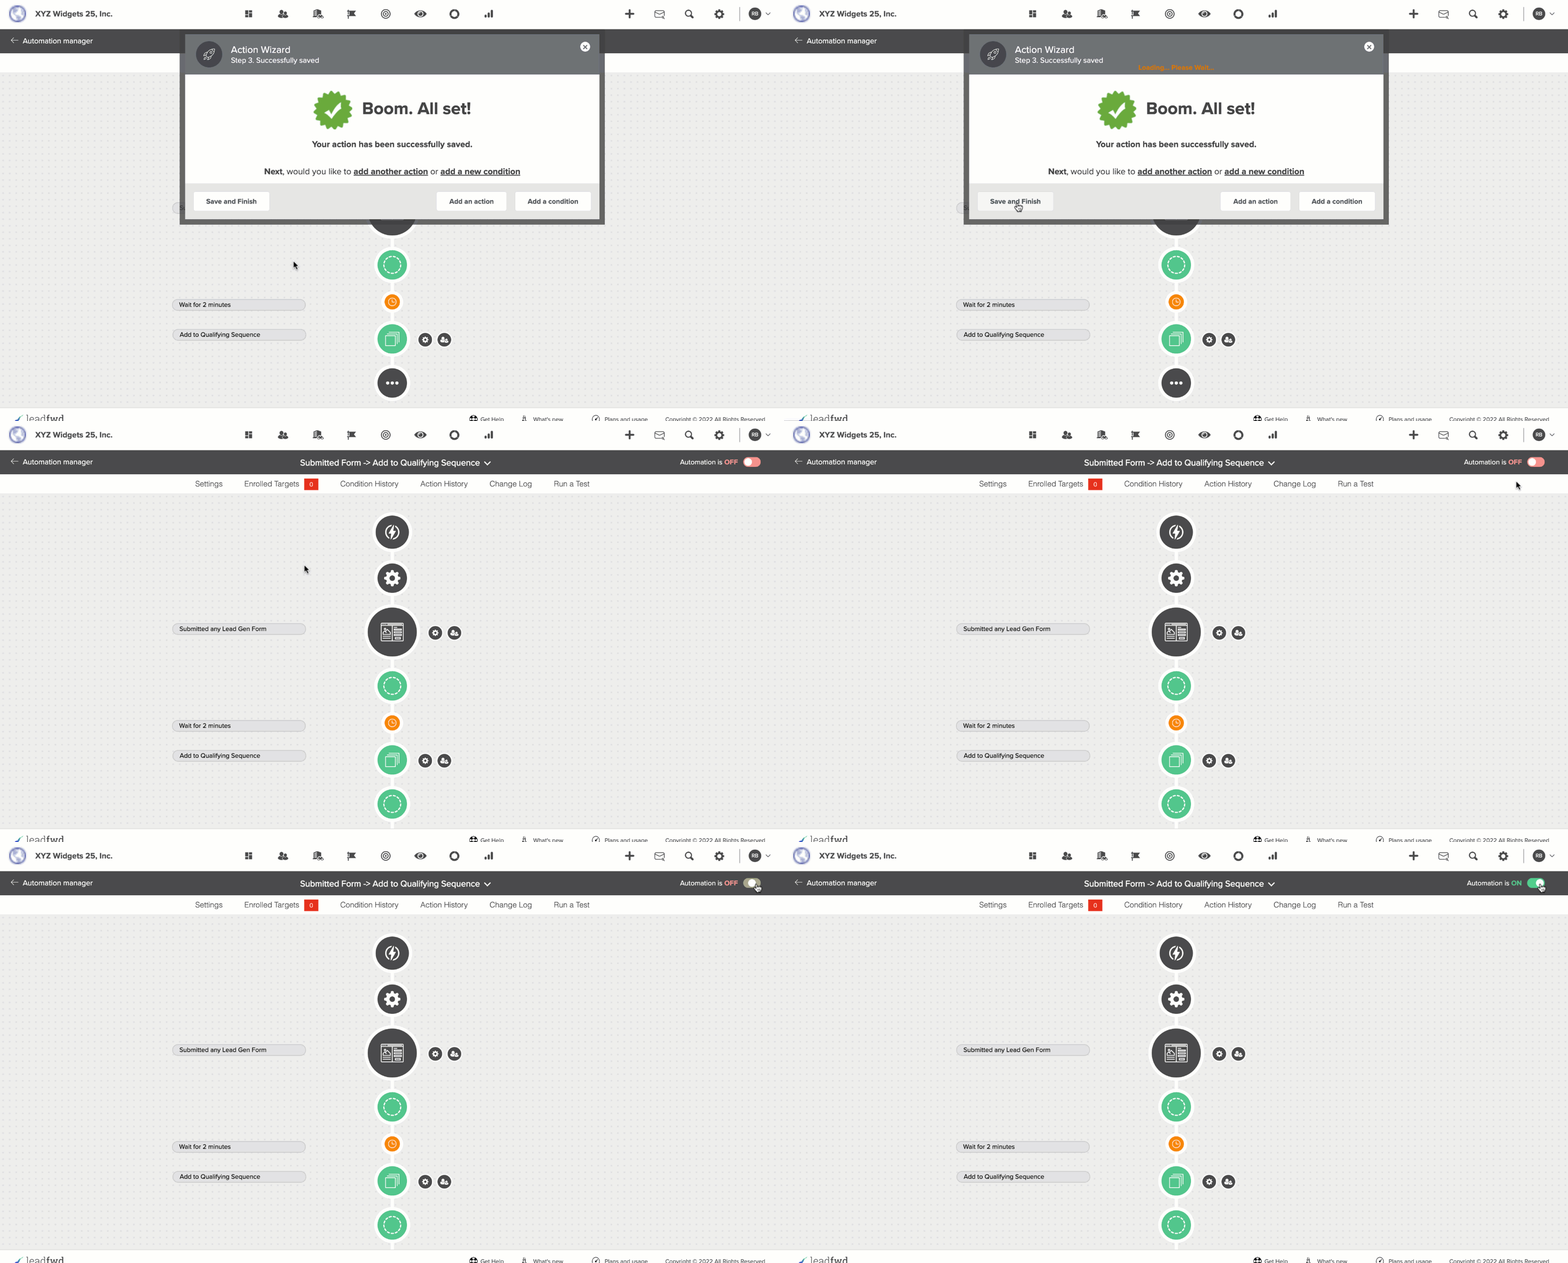
The option to turn on your Automation workflow, will appear after you select Save and finish. If it does not appear, simply hit refresh in your browser. Toggle the option to the right and the color indicator will turn green, indicating that your workflow is now activated.
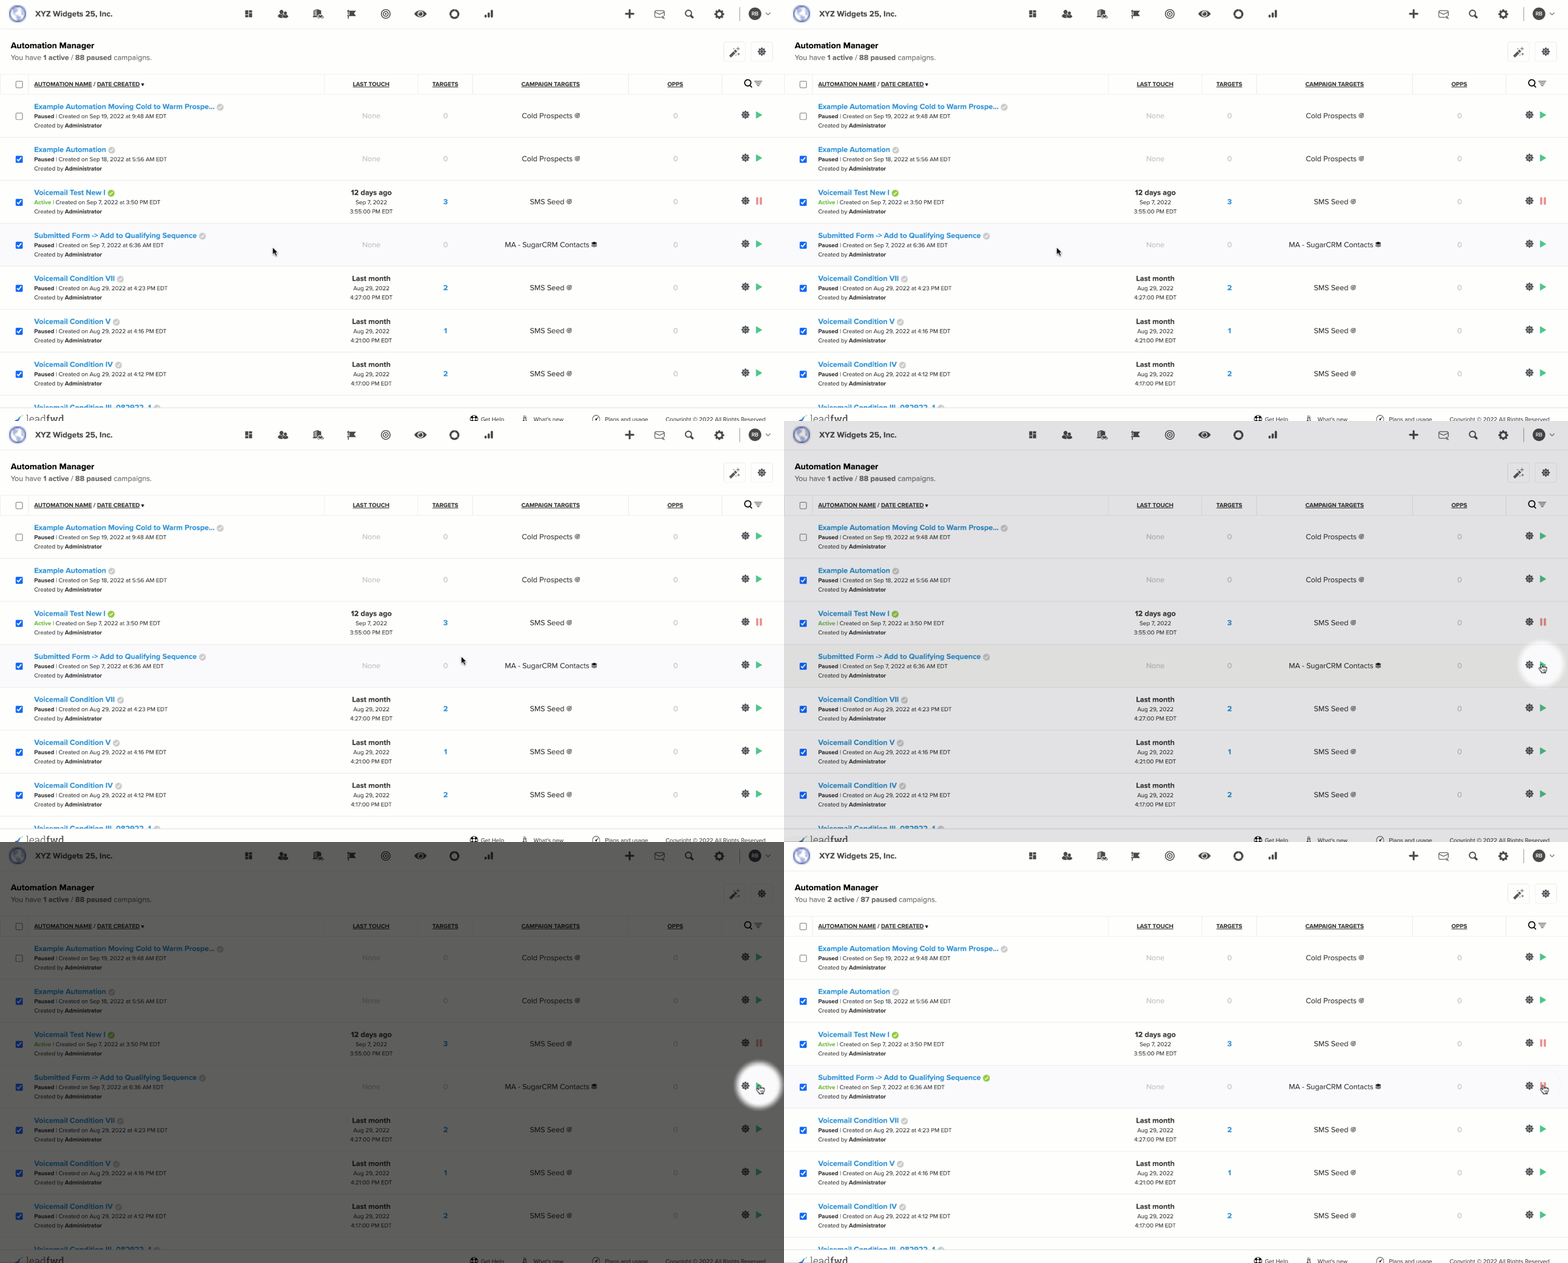
You can also activate and pause workflows from the Automation Manager list view, as demonstrated below:
Comments
0 comments
Please sign in to leave a comment.